


| Home |
|
|||
| ||||
Customizing Star Wars Minis 12Snowtrooper on Blizzard Force Speeder Bike (Part 2) | ||||
|
Welcome to the twelfth in a series of articles about customizing Star Wars Miniatures. In this final installment, we'll finish working on a more advanced customizing project involving both a vehicle and its rider. Be sure to check out article 11 before starting any of the steps below. In the last article, we began building a custom of a Snowtrooper on the Blizzard Force Speeder Bike that led the Imperial troops in the Battle of Hoth. We started with a Scout Trooper on Speeder Bike and a Snowtrooper with E-Web Blaster and separated them into the pieces needed. Then we trimmed and pinned to prepare the pieces for combining them into one custom. Now, we're ready to start the second half of this project. Take the pinned barrel of the E-Web and glue it in place on the underside of the bike. Check the barrel's position to make sure that it is aligned between the two bars that make up the front forks of the bike and that it runs parallel to them as well. Once that is securely dried in place, carefully glue the E-Web computer fire control on the side of the engine opposite the air intake. After it has set, add another drop of glue to help secure it even more. Let the glue completely dry before moving to the next step.  We'll paint this custom in sections to make it easier to reach certain areas. For the first step, paint a primer coat of black on the entire bike, including the newly added E-Web parts. Don't forget to paint the handlebars, the foot pedals, and the underside. Take care not to accidentally paint the clear post holding the bike to the base. The bike has many small spaces and varied surfaces, so be sure to check it over to ensure that you've painted every part. This is especially true for the front fin section and the entire back around the thrust flaps. This primer coat of black will help the details stand out when we apply paint in later steps. 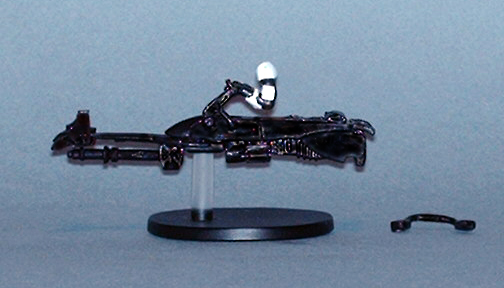 When the black primer coat is completely dry, mix a light gray color. Dry-brush this color on the entire engine and the E-Web barrel (see article 3 on painting techniques). Be sure that you dry-brush the engine on the back of the bike but not the thrust flaps or the bike's body. Next, dry-brush the handles on all sides and completely paint the foot pedals. Carefully paint the bars that make up the front forks and the support rods that hold them onto the bike's main body. Be sure to paint the center post between the forks and the mounting that connects the bars to the front fins. Don't forget to paint the front of the front fin mounting as well as the fork bars on the underside of the bike. Take your time and be sure that you get all sides of each element. 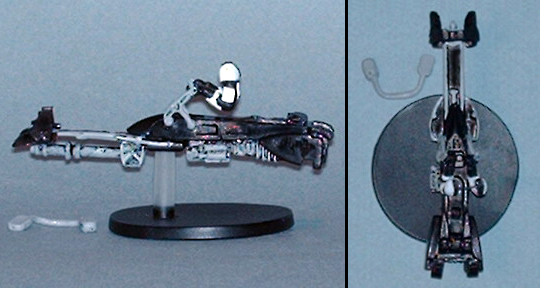 Once all the gray elements are completely dry, it's time to paint the white sections. First, paint the arms holding the handlebars, being sure to paint the hands but not the handles. Next, paint the main section of the body of the bike but not the survival kit or the straps that hold the kit to the main body of the bike. The rear coverings should be painted but not the thrust flaps that are attached to them. Carefully paint the front fins, being sure to get all sides. Use several thin coats of paint as needed until you get a nice, bright white. Don't rush -- be sure that each coat is dry before you start the next coat, and use smooth strokes. Finally, mix a light tan color, and dry-brush the survival kit but not the straps holding it to the bike.  When the last coat has completely dried, carefully glue the Snowtrooper to the seat while holding the bike securely by the main part of the body. Be sure that the rider is sitting upright in the seat and not at an angle. After that dries, carefully glue the arms on at the shoulders. Once that has set completely, apply white paint where the shoulders meet the body to hide any gaps. Finally, check the foot pedals to make sure they match the feet of the Snowtrooper, and check where the pedal bar angles up to the bottom of the back of the bike. When the correct position is determined, glue the pedals to the bottom of the feet. Once that connection has set, glue the pedal bar to the bottom back section of the bike.  If needed, use the hot water method (see article 4) to straighten out any bending that took place while painting and gluing. Now your Snowtrooper on Blizzard Force Speeder Bike is ready to lead the Imperial forces to victory! You can use this custom in place of any Scout Trooper on Speeder Bike in your miniature games, or if you wish, you can create custom stats to use in friendly games or in a roleplaying adventure.  Variations of This CustomVariation 1 If you don't want to cut up a Snowtrooper with E-Web Blaster, you can use a regular Snowtrooper instead. Just cut the Scout Trooper and the Snowtrooper in half at their belt lines and cut their arms off at the shoulders. Replace the body of the Scout Trooper with the body of the Snowtrooper. Then make the Snowtrooper's skirt out of two-part epoxy or baked clay (see article 8). Variation 2 If you don't want to mount the E-Web Blaster to the bottom of the Speeder Bike, you can use it to make an additional custom. Follow all of the directions above, but don't cut the E-Web apart. Instead, glue the arms holding the handles of the E-Web to the body of the Scout Trooper that is removed from the Speeder Bike. When that dries, glue the feet of the Scout Trooper to the base. Paint the arms black to match the other Scout Troopers. You'll end up with a Snowtrooper on Blizzard Force Speeder Bike and a Scout Trooper with E-Web Blaster. Variation 3 The last variation requires only a Scout Trooper on Speeder Bike. Pull the arms from the Scout Trooper, then carefully pull the Scout Trooper from the bike. Paint the bike black including the arms holding the handle bars. Paint the Scout Trooper black and the eyes of the visor bright green. Dry-brush the engine and paint the fork bars and the foot pedals a very dark gray, as described above. Glue the Scout Trooper back into position. Now you have a Storm Commando on Stealth Speeder Bike. Next Time?For now, this concludes the series on customizing Star Wars Miniatures. I hope you enjoyed these articles as much as I enjoyed writing them. With the tips and techniques covered in this series, you should be able to create almost anything you can imagine. Until next time, keep on making customs, and may the Force be with you! About the AuthorJack Irons is an artist and graphic designer. He has been fan of Star Wars since he was four, when his dad took his sister and him to a matinee on the second day of its release. He posts regularly on the Star Wars Miniatures Game boards under the name "ironlightsaber" and often works with other board members on projects such as the Lost Twenty fan set. Jack lives in the middle of the U.S. with his wife Ruth and their son. | ||||


